| Search | Login/Register
   Home » Melquiades Amplifier » Planning my DSET (187 posts, 10 pages)
  Print Thread | 1st Post |  
Page 6 of 8 (187 items) Select Pages:  « First ... « 4 5 6 7 8 »
04-19-2017 Post does not mapped to Knowledge Tree
anthony
Posts 335
Joined on 08-18-2014

Post #: 126
Post ID: 23174
Reply to: 23173
No, no Pieter
Lucas Cant from Black Art Automation in Melbourne.  I cannot recommend him highly enough.
04-23-2017 Post does not mapped to Knowledge Tree
anthony
Posts 335
Joined on 08-18-2014

Post #: 127
Post ID: 23182
Reply to: 23166
EM Shielding, do or don't?
 anthony wrote:
...you've got me thinking about this now.  I'll talk to some people here and see what they think, but it should be easy enough to place a shield between the OPT's and the tube bases.

Thanks for bringing it up.  I am looking for other angles to view the design, and yourself and Jarek have been very helpful.


I've talked to my advisers here about the potential EM induction at the tube sockets from the various OPT's situated beneath.  It is not easy to see on the sketches, but absolute minimum separations are 60mm for the smaller, high frequency OPT's and 75mm for the huge Bass OPT.  Basically, because the voltages are relatively low at about 200VDC those minimum separations are expected to be "plenty".  

If this was a 211 amp with 1800V on the plate then there would definitely be an issue even at 40cm...shielding would be essential.

So I am going to go without shielding in those locations for now.  If I have problems then I should be able to retrofit something, but fingers crossed that will not need to happen.

Thanks for bringing it up guys.
04-23-2017 Post does not mapped to Knowledge Tree
Paul S
San Diego, California, USA
Posts 2,571
Joined on 10-12-2006

Post #: 128
Post ID: 23183
Reply to: 23182
Mock-up
That's good news, Anthony; no sense doing something like that just to do it.  If you really wanted to, you could fire up the trannies and measure the fields.


Best regards,
Paul S
11-23-2017 Post does not mapped to Knowledge Tree
anthony
Posts 335
Joined on 08-18-2014

Post #: 129
Post ID: 24574
Reply to: 23183
Some more DSET photos..
My DSET amplifiers are starting to go together (slowly).

Bias string and bleeder relays/resistors...

Bottom Floor Done 1.jpg


The remainder of the filter caps.  
Bottom Floor Done 3.jpg


The middle floor goes on and the filter cap for the First Stages (6E5P/6E6P).

2nd Floor in place 3.jpg


Then the OPT's go in place and the shelf that has most of the bias pots and lpads...
A wee bit more.jpg

A wee bit more 2.jpg

A wee bit more 3.jpg

The big Bass OPT is finalised in place but the other OPTs are just sitting there and awaiting more wiring.


02-14-2018 Post does not mapped to Knowledge Tree
anthony
Posts 335
Joined on 08-18-2014

Post #: 130
Post ID: 24695
Reply to: 24574
DSET labels
I am making steady progress putting together my DSET amplifiers.  Life and work gets in the way but I am chipping away at it, taking my time, not rushing, enjoying it.  Wow, it is a lot of work and an enormous task for my first complete amplifier build but I'll get there in the end.

Today I picked up from the signwriter some little stickers for the ammeters on the amplifier.  There is even a spare sticker just in case I end up with a Midbass Channel rather than the Injection Channel.

In Place 1.jpg


In Place 2.jpg


I hope to begin power-on testing of the first DSET in the next week or two...it's getting close...

Almost ready.jpg

Almost ready 2.jpg

02-15-2018 Post does not mapped to Knowledge Tree
Romy the Cat


Boston, MA
Posts 10,049
Joined on 05-28-2004

Post #: 131
Post ID: 24696
Reply to: 24695
Some thoughts.
You decided to go with mA or are they mV against 1R resistors? I prefer the second approach personally and I feel that I can moderate the quality of resistor and I can’t moderate the quality of the milliampere meter coil. 
 
The whole thing looks like very well thought out. A few comments I would like to pass. 
 
You are right now in a very interesting state when you do the internal wiring. The internal wiring. Is to a degree is an art form and it might be very interesting. There are low and high voltages, AC and DC, twisting and not, crossing with minimum angles, some transmission line considerations, signal wires, grounding, approximations, shortening wire paths, maintainability, ease to access and many other considerations that you need to keep in perspective. It is very interesting and creative phases, do not harry to go through with it, spend some time and do it better and methodological. Do the same wiring schema for both R and L amplifiers. When you will be doing the second amp you will find better way to wire it. It is debatable if you want to improve the second one or to the second one as a direct replica of the first one. BTW, did you do it as two identical or you went full-throttle and made it mirroring? 
 
Also, if everything is works fine then the only part that you might need access it future will be the input filters in case you want to experiment with drivers or do channels adjustments. Make it accessible. Do not forget to do a full sweep of the individual channel after you will be done. You need to make sure that the channels and the filters are working properly. 
 
The last thing. Do buy for yourself a Phase Testers. This is absolutely mandatory tool for your speakers. They call it “Speaker polarity tester”. I use the track #23 from Sheffield Labs 
 
https://www.amazon.com/Sheffield-A2TB-Test-Disc-My/dp/B000V93NKY 
 
Depends what tester you use you might not have a sensitivity of you tester to test at LF. There are some techniques how to deal with it. Anyhow, even a cheap $10 tester for Car Audio is better than to spend half of life to worry where is black and where is red binding posts.


"I wish I could score everything for horns." - Richard Wagner. "Our writing equipment takes part in the forming of our thoughts." - Friedrich Nietzsche
02-16-2018 Post does not mapped to Knowledge Tree
anthony
Posts 335
Joined on 08-18-2014

Post #: 132
Post ID: 24697
Reply to: 24696
They are for mA
 Romy the Cat wrote:
You decided to go with mA or are they mV against 1R resistors? I prefer the second approach personally and I feel that I can moderate the quality of resistor and I can’t moderate the quality of the milliampere meter coil. 


The ammeters that I have here are quite inexpensive but were one of the few that I could find with a specified coil resistance.  It is 3000ohm.  So I use a 0.6R resistor to set the ammeter scale to 250mA, 0.75R resistor for 200mA and 3R for 50mA at full deflection.  All are quite low values so I think it should be ok.

 Romy the Cat wrote:

You are right now in a very interesting state when you do the internal wiring. The internal wiring. Is to a degree is an art form and it might be very interesting. There are low and high voltages, AC and DC, twisting and not, crossing with minimum angles, some transmission line considerations, signal wires, grounding, approximations, shortening wire paths, maintainability, ease to access and many other considerations that you need to keep in perspective. It is very interesting and creative phases, do not harry to go through with it, spend some time and do it better and methodological. Do the same wiring schema for both R and L amplifiers. When you will be doing the second amp you will find better way to wire it. It is debatable if you want to improve the second one or to the second one as a direct replica of the first one. 


Yes, I built both amplifiers to the same stage (about half finished) and once things got a bit murky regarding the limitations of the wiring I left the second one at a sensible stage and have gone on with the first.  In particular I am hoping that the 6.3V filament wiring for the first and single stages is far enough removed from anything that matters.  I am not sure if it is but that will show up in the measurements.  I have an audio analyser here that I will use to assess and fine-tune the noise levels so hopefully my preparations have been thorough and not to much will need to be altered.
 Romy the Cat wrote:
BTW, did you do it as two identical or you went full-throttle and made it mirroring? 
  

Yes, the amplifiers and the power supplies are both mirrored.

 Romy the Cat wrote:

Also, if everything is works fine then the only part that you might need access it future will be the input filters in case you want to experiment with drivers or do channels adjustments. Make it accessible. Do not forget to do a full sweep of the individual channel after you will be done. You need to make sure that the channels and the filters are working properly. 
  

Yes, the filters are very easy to get to and hopefully relatively easy to alter.  
 Romy the Cat wrote:

The last thing. Do buy for yourself a Phase Testers. This is absolutely mandatory tool for your speakers. They call it “Speaker polarity tester”. I use the track #23 from Sheffield Labs 
  
https://www.amazon.com/Sheffield-A2TB-Test-Disc-My/dp/B000V93NKY 
  
Depends what tester you use you might not have a sensitivity of you tester to test at LF. There are some techniques how to deal with it. Anyhow, even a cheap $10 tester for Car Audio is better than to spend half of life to worry where is black and where is red binding posts.


Thanks Romy, I'll do that.
12-31-2018 Post does not mapped to Knowledge Tree
anthony
Posts 335
Joined on 08-18-2014

Post #: 133
Post ID: 25212
Reply to: 24697
Finally firing up the DSET
Hi Romy,

What a busy year just gone!  Finding enough time to just sit down and get the DSET's going has been impossible, but I have time now and have started the process.

At the moment I am introducing some high voltage to the first amplifier chassis, only the Bias and First Stages (for A, B, C channels) - no HV yet for Second Stages, Single Stages or DHT Channel (my DHT has its own power supply).  All tubes for all channels are in their sockets.  It is confounding me.  Firstly, the -200V Bias supply takes ages to come up to voltage but it does get there...no issues for the +200V side, it charges is 200uF caps almost instantly, but 9,000uF on the negative side takes almost 90 seconds to get to -200V, and the negative 0A2 does not light up until about 90 seconds after the bias supply starts to power up.  There is an issue there...how long does it take your negative 0A2 to ignite Romy?

Secondly, and these issues may be related, the First Stages 6E5P (for Channels A, B, C) are not behaving as I would expect.  I've checked the wiring a number of times and as far as I can tell it matches the schematic, and while A and C sit at about 200V at their anodes, Channel B sits at 400V or so and its 15K 12W resistor is staying cool and not drawing any current which means that the tube is not conducting.  I've checked resistances from the tube socket to other parts of the circuit and swapped tubes and nothing changes.

Romy, are you able to think of something that could be causing these problems?  I think it likely that they are both linked to the same fault, but I just cannot put my finger on it.

Happy New Year,

Anthony 
01-01-2019 Post does not mapped to Knowledge Tree
anthony
Posts 335
Joined on 08-18-2014

Post #: 134
Post ID: 25213
Reply to: 25212
The bias
Hi Romy,

Further to my earlier message, I've measured the bias voltages for the driver tubes in all Channels.

A -4.3V not adjustable
B -13.82V not adjustable
C -4.8V not adjustable
D -4.2V (ran out of potentiometer travel...may have to adjust a resistor)
E uses fixed cathode bias...not measured this round
F -4.3V (adjustable with pot.)

Looks like something is going on with A/B/C.  B is the worst and is the 6E5P that is not conducting (has 400V at the anode).  I've not installed the crossover components in this channel yet (the 12.1K resistor and 0.043uF cap to ground) but perhaps I should install something even though the crossover point will probably change...I'd not have thought they would make a difference at this stage.

Regards,

Anthony
01-01-2019 Post does not mapped to Knowledge Tree
Romy the Cat


Boston, MA
Posts 10,049
Joined on 05-28-2004

Post #: 135
Post ID: 25215
Reply to: 25212
Try to debug more.
 anthony wrote:
Firstly, the -200V Bias supply takes ages to come up to voltage but it does get there...no issues for the +200V side, it charges is 200uF caps almost instantly, but 9,000uF on the negative side takes almost 90 seconds to get to -200V, and the negative 0A2 does not light up until about 90 seconds after the bias supply starts to power up.  There is an issue there...how long does it take your negative 0A2 to ignite Romy? 
 
I think it takes around 60 seconds on my amps. I have 2 minutes delay for high voltage, so it all within the limit. Do not be too hurry, for the first 30 minutes the amp do not sound so great anything. Those 6C33C need some tome to burn in and to reach the cruse operation state. I think after 30-45 min they are fine. If you did not use the amp for let say a week then burn the tubes for 2 hours at least to make the amp so sound “soft” again.

 anthony wrote:
Secondly, and these issues may be related, the First Stages 6E5P (for Channels A, B, C) are not behaving as I would expect.  I've checked the wiring a number of times and as far as I can tell it matches the schematic, and while A and C sit at about 200V at their anodes, Channel B sits at 400V or so and its 15K 12W resistor is staying cool and not drawing any current which means that the tube is not conducting.  I've checked resistances from the tube socket to other parts of the circuit and swapped tubes and nothing changes.

I had it many times and it was always that I found in the end that that I did something wrong. If the channels A and C do give you 200V but C does not then C is not wire in the same way. You should have 400V on plate, 3.5-4V on grid, the heater should be up, the pun 5 and 2 have to be shunted by a small resistor and you should have quite hot plate loading resistor. There is a remote chance that a pin your tube socket got broken and the tube pin does not get voltage…


"I wish I could score everything for horns." - Richard Wagner. "Our writing equipment takes part in the forming of our thoughts." - Friedrich Nietzsche
01-01-2019 Post does not mapped to Knowledge Tree
Romy the Cat


Boston, MA
Posts 10,049
Joined on 05-28-2004

Post #: 136
Post ID: 25216
Reply to: 25213
A bug in negative supply chain on channel B
 anthony wrote:
Hi Romy,

Further to my earlier message, I've measured the bias voltages for the driver tubes in all Channels.

A -4.3V not adjustable
B -13.82V not adjustable
C -4.8V not adjustable
D -4.2V (ran out of potentiometer travel...may have to adjust a resistor)
E uses fixed cathode bias...not measured this round
F -4.3V (adjustable with pot.)

Looks like something is going on with A/B/C.  B is the worst and is the 6E5P that is not conducting (has 400V at the anode).  I've not installed the crossover components in this channel yet (the 12.1K resistor and 0.043uF cap to ground) but perhaps I should install something even though the crossover point will probably change...I'd not have thought they would make a difference at this stage.


Anthony, it is OK. The voltages at all channels are near OK (with exception of C). The bias voltages are irrelevant as all that you care is to get near 200V on plates. It is depending from the tubes you got. It might be 3.5V of 4.5, it is truly irrelevant. You do not want to be at 1.5V as some of other types tubes do as it will be flooded by input voltage and you will clip the driver stage. This amp has no feedback, so no voltage injection into cathode is applied. In our case we have 6E5P that has a relatively high bias and with over 3.5V you will hardly be able to drive the first tube out of A1 operation. 
 
Your channel B bias is 13.82V wish is the problem. The tube is closed with such high bias. As you will bring the bias doe to near 4V the tube will open and the plate current will flow. You nned to debug your negative supply chain on channel B


"I wish I could score everything for horns." - Richard Wagner. "Our writing equipment takes part in the forming of our thoughts." - Friedrich Nietzsche
01-01-2019 Post does not mapped to Knowledge Tree
anthony
Posts 335
Joined on 08-18-2014

Post #: 137
Post ID: 25217
Reply to: 25216
Damn crossovers
 Romy the Cat wrote:

I think it takes around 60 seconds on my amps. I have 2 minutes delay for high voltage, so it all within the limit. 


That is good to know Romy.  It was quite frustrating when I though I had a major problem in the Bias Supply that I was unable to diagnose.  My power transformer is probably a little smaller than yours and just takes more time to fill all that capacitance.


 Romy the Cat wrote:

Your channel B bias is 13.82V wish is the problem. The tube is closed with such high bias. As you will bring the bias doe to near 4V the tube will open and the plate current will flow. You nned to debug your negative supply chain on channel B


Thanks for your thoughts Romy.  Last night I roughly wired in some random crossovers (the same values as in your schematic) and my troublesome Channel B came closer to the fold.  It now sits at -7.3V bias and is pulling 290V which is at least conducting something now.   This morning I will check again the correct resistor values in that string and then adjust a value so that it pulls roughly the correct voltage.

DSET First Stages 5.jpg
01-02-2019 Post does not mapped to Knowledge Tree
anthony
Posts 335
Joined on 08-18-2014

Post #: 138
Post ID: 25218
Reply to: 25217
Six Channels are UP
Hi Romy,

So, six channels are now operational in the first DSET.  By up I mean the anode voltages on all tubes is about right and the currents are in the ballpark of where they need to be.  I am yet to check the DC Offset so hopefully that goes ok.

Initially the gas regulators were only drawing about 9mA each, which is a bit low, so I paralleled the 5k 12w resistors leading in to the tubes and have ended up with 15mA for both 0A2's.  This has actually helped the slow startup problem and the negative tube now starts about 30s earlier at about 65 seconds after the bias supply is energised.

The Channel B is still an issue of sorts.  I have reduced R5 from 12k to 5k to get down to 200v at the anode of the 6e5p.  For the life of me I can't figure out why because all components in the bias string are the correct value and the cap is polarity correct.  Channels A & D also operate from the same arrangement for the positive bias and they hit their targets first time, so to my thinking it must be an issue in the negative bias string, however that string is correctly installed.  So, I have a decision to make.  In Channel B, assuming that I use a similar first order  RRC Low Pass filter at the start, do I reduce the 30k resistor by 7k, or do I reduce the 12.1k resistor that sits closer to the grid by 7k?  I am leaning toward changing the crossover resistor, and am not even sure either will make an audible difference.  

One thing has become very clear to me while sorting out this first DSET...the crossovers in Channels A-D affect the operation of the bias, so when changing filters I may have to re-tune the bias for that channel.  I think that I will figure out a way to install some test points to make everything easier.  They can stay under the covers and out of sight when the amp is closed up.  It may also be useful to be able to easily check the anode voltage of the first stage tubes when they get changed out in the future...I have some nice digital voltmeters here that could be run off the service supply or even a battery...I'll look into it. 


Cheers,

Anthony
01-02-2019 Post does not mapped to Knowledge Tree
Paul S
San Diego, California, USA
Posts 2,571
Joined on 10-12-2006

Post #: 139
Post ID: 25219
Reply to: 25218
Test Points/Trim Pots
Anthony, congratulations on getting your project to this point!  I mention without referring back to your schematics, I think you will be glad to have test points, along with variable resistors (trim pots) to re-set operating points, as needed, if only for normal drift. This can help avoid insanity down the road, and it also give you the chance to "dial in" your operating points by ear, when you are ready to do this. Again, I am not sure what's called out. In any case, ESR changes with X/O changes would make VRs useful there, as well.

Best regards,
Paul S
01-03-2019 Post does not mapped to Knowledge Tree
anthony
Posts 335
Joined on 08-18-2014

Post #: 140
Post ID: 25220
Reply to: 25218
Shot too early...
 anthony wrote:
Hi Romy,

So, six channels are now operational in the first DSET.  By up I mean the anode voltages on all tubes is about right and the currents are in the ballpark of where they need to be.  I am yet to check the DC Offset so hopefully that goes ok.


Looks like I spoke too early.  When I made that statement I'd only tested the voltages in the DHT Channel and they were pretty close to correct...but when I put a tube in there it glowed a little too hot so I quickly shut it down.   Bugger!  

Romy, without any DHT tube in place, I have 403V coming out of the big filter cap for the DHT Channel (separate power supply) and 147V/8.3mA at the anode of the 6e5p which is a little higher/lower than the 140V/10mA on your schematic.  I am wondering if this lower current could be the problem?  I added some more resistance to drop the anode voltage and although I thought it was going to drop it 9V it only dropped it 3V, and the anode current remained at 8.3mA.  Tomorrow I will drop the anode voltage further so see if that raises the current.

On the schematic at the DHT tubes you have annotated a couple of red voltages and I am unable to measure the 184V at the cathode and the grid is measuring very low (without a DHT tube in the socket) at 148V where 224V is required.  

It would be great if you could remember some of your time with the DHT Channel.  I've only just got my head partially around your IDHT Channels and this circuit is almost entirely different again. 
01-03-2019 Post does not mapped to Knowledge Tree
anthony
Posts 335
Joined on 08-18-2014

Post #: 141
Post ID: 25221
Reply to: 25219
Tube change simplicity
 Paul S wrote:
Anthony, congratulations on getting your project to this point!  I mention without referring back to your schematics, I think you will be glad to have test points, along with variable resistors (trim pots) to re-set operating points, as needed, if only for normal drift. This can help avoid insanity down the road, and it also give you the chance to "dial in" your operating points by ear, when you are ready to do this. Again, I am not sure what's called out. In any case, ESR changes with X/O changes would make VRs useful there, as well.

Best regards,
Paul S


Thanks for your words Paul.  I am very tempted to make the tube change experience as simple as possible, without mucking up the look to the whole amplifier.  We will see what I can come up with.

Cheers,

Anthony
01-03-2019 Post does not mapped to Knowledge Tree
Romy the Cat


Boston, MA
Posts 10,049
Joined on 05-28-2004

Post #: 142
Post ID: 25222
Reply to: 25218
So far so good...

 anthony wrote:
Thanks for your thoughts Romy.  Last night I roughly wired in some random crossovers….
I wrote a loooong replay to you after that post but my 2.5 yo son turned off my computer while I was posting it. Hate to rewrite it….Your chasses design look spectacular by the way. In many year what your will dive back to that amps you will not believe you did it.
 
 anthony wrote:
So, six channels are now operational in the first DSET.  By up I mean the anode voltages on all tubes is about right and the currents are in the ballpark of where they need to be.  I am yet to check the DC Offset so hopefully that goes ok.
Congratulations. Do not be too anal about the anode voltages. For both stages anything above 175 will go, do care about plate current, particularly on the driver stage and at DHT stage.

 anthony wrote:
The Channel B is still an issue of sorts.  I have reduced R5 from 12k to 5k to get down to 200v at the anode of the 6e5p.  For the life of me I can't figure out why because all components in the bias string are the correct value and the cap is polarity correct.  Channels A & D also operate from the same arrangement for the positive bias and they hit their targets first time, so to my thinking it must be an issue in the negative bias string, however that string is correctly installed.  So, I have a decision to make.  In Channel B, assuming that I use a similar first order  RRC Low Pass filter at the start, do I reduce the 30k resistor by 7k, or do I reduce the 12.1k resistor that sits closer to the grid by 7k?  I am leaning toward changing the crossover resistor, and am not even sure either will make an audible difference.  
I am not sure what you have in there, I would keep the R5 as is. You should have -150V at point #06 that should burn in the 1K and 420K resistor, arriving at driver tube grid at ~-4V. You need to short the chela B input and to measure the -4V at grid. At that time of you have 200V on plate the tube will be completely operational. Then you apply positive bias on the left side of the filter (resistor 30K). The voltage on the left side will be different and you need to turn you positive supply trimmer to set it to 0mv. The p[point is that positive supply need ONLY to get rid of current flow over the filters, the amp should work fine of you short the inputs.  Make sure that you .043uF cap to ground is not shorted. From what you describe it might be the case.

 anthony wrote:
One thing has become very clear to me while sorting out this first DSET...the crossovers in Channels A-D affect the operation of the bias, so when changing filters I may have to re-tune the bias for that channel. 
Yes and no. Your bias is your 12.1K resistor, pretend it as a virtual buttery. Or you can pretend it a firewall for you bias voltage. Now, when you calculate a filter you do it considering the load impedance, in my case it is 12.1K and I intentionally too keep it the same in all channels. There are too many variables to equate if you begin to change the bias rector. The key point is that if you change filter resistors AND bias resistors then the amount of voltage you have available in positive bios supply will not be enough for you to set 0V at input. So, you would need to assure R11 resistor to make sure that you VR1 will be able to set 0V in the middle of own operation. To me it is too many changes and I prefer to keep my bias resistor at 12.1K and if I want to change the crossover point then I just adjust the series resistor and the cap to ground. There are two things you need to recognize. First, in the channel B the first restore 30K and shunt 12.1K are not a filter but voltage divider that mitigate the volume of the channel output. The filter is a combination of 30K resistor and cap to the ground. Second, is that when you change you filter make sure that in your circulation you use ONLY Bessel curve, it is important.
 
Generally speaking I would be interested to know how you like to change the crossovers. I feel that sine you have the same configuration as I do I know that result you should be getting and there is a HUGE amount of time invested into this thing to do experimentation, listening, testing, measuring etc and there is not a lot known to me room for improvements. Trust me it has  nothing to do with ego  and I will LOVE to learn if you fine any better way to organize what has been organized, unless you use other compression driver…


"I wish I could score everything for horns." - Richard Wagner. "Our writing equipment takes part in the forming of our thoughts." - Friedrich Nietzsche
01-03-2019 Post does not mapped to Knowledge Tree
Romy the Cat


Boston, MA
Posts 10,049
Joined on 05-28-2004

Post #: 143
Post ID: 25223
Reply to: 25220
Keep dong what you do...
 anthony wrote:
Looks like I spoke too early.  When I made that statement I'd only tested the voltages in the DHT Channel and they were pretty close to correct...but when I put a tube in there it glowed a little too hot so I quickly shut it down.   Bugger!

What tube do you use? I hope you did not experimented with 4V tubes! When you have the things in test state then get any cheap tubes (45,2a3 etc..) and to experiment on them

 anthony wrote:
Romy, without any DHT tube in place, I have 403V coming out of the big filter cap for the DHT Channel (separate power supply) and 147V/8.3mA at the anode of the 6e5p which is a little higher/lower than the 140V/10mA on your schematic.  I am wondering if this lower current could be the problem?  I added some more resistance to drop the anode voltage and although I thought it was going to drop it 9V it only dropped it 3V, and the anode current remained at 8.3mA.  Tomorrow I will drop the anode voltage further so see if that raises the current.
The DHT channel is direct coupled, so you need to be very careful with it as the plate on the driver tube acts as bias of the DHT. The 147V/8.3mA you got is OK if would not make the DHT to flash. Make sure that when DHT get high voltage the pate voltage of the driver tribe has been stabilized.

 anthony wrote:
It would be great if you could remember some of your time with the DHT Channel.  I've only just got my head partially around your IDHT Channels and this circuit is almost entirely different again. 
Well, the DHT and IDHT are different animals for sure, the driver state look very different for them in my amp and here is the reason. I wanted to use the same driver tube for sure and I want it to be direct coupled. The problem that the 5E6P has too much gain to drive my IDHT directly, so I need to reduce the 5E6P gain. I went to a classic cathode bias. The cathode bias has been wonderful but it has a major problem: the cap on cathode. The cap is need there to get the nominal tube gain but in my care I need to gain. So I left the cathode cap out and get my IDHT the lower voltage it needed. I do not remember the numbers now, you need to look in the thread where I experimented with it. I can post a link if you want me.


"I wish I could score everything for horns." - Richard Wagner. "Our writing equipment takes part in the forming of our thoughts." - Friedrich Nietzsche
01-03-2019 Post does not mapped to Knowledge Tree
anthony
Posts 335
Joined on 08-18-2014

Post #: 144
Post ID: 25224
Reply to: 25223
In my dreams
I woke up this morning to have the brightest thought that my DHT issues are probably caused by how I have wired up the filament transformers.  When I ordered all the transformers for this project I gave Lucas of Black Art Automation the design brief 'build the best you can'...that's kind of like signing a blank cheque...but we talked about building tight regulation transformers on big cores with minimal heat gain et cetera, and one of the things that he did was make individual 2.5V and 4V transformers for the DHT filaments.

There's nothing wrong with that of course but they are also centre-tapped, which I was not expecting.  I have brought the centre-tap into the amplifier chassis and bonded it to the chassis ground, which I am thinking is not allowing it to float to make the 184V reading at the DHT Cathode: it stays firmly planted at 0V when the DHT is getting too hot.  

I hope that is the issue because I would also like a couple of extra wires in the filament cable so that the 12.6V filament supply can be parallel wired to offset a larger than expected voltage drop.
01-04-2019 Post does not mapped to Knowledge Tree
anthony
Posts 335
Joined on 08-18-2014

Post #: 145
Post ID: 25225
Reply to: 25224
Aaarrggghhhhh
 anthony wrote:
I woke up this morning to have the brightest thought that my DHT issues are probably caused by how I have wired up the filament transformers. 


After rewiring the filament transformers this morning, I have spent all day trying to figure out why there is next to no current flowing across the cathode resistor of the DHT tube.  Wiring was checked every which way, measurements were taken, exasperation mounted, everything was ruled out, I even rewired half of the circuit just in case I had a broken wire somewhere...India is thrashing us in the cricket...nothing was going to plan.  I was miserable.

Then I swapped the used YO186 I purchased just for this testing stage and put in a NOS 1939 vintage tube and the circuit worked straight away with all voltage and current targets just perfect.  Put in a 45 and it was just as perfect.

Good to have it working though...just wish it had been 8 hours earlier!  So all 6 channel of the first DSET are now operating.

The DC Offset would not trim to zero and 0.1mV was as low as it would go before running out of trimpot.  The pot from one end to the other would only adjust the DC Offset by 0.7mV, which is much less than I thought it would.  My 0A2 are quite closely matched for voltage and are within 0.3V of each other.  Swapping the tubes had no effect on the DC Offset so I might have to play with another tube to cancel that offset to zero.

With the input shorted I made some quick noise measurements at the output of each channel:
A - 0.2mVAC
B - 0.2mVAC
C - 0.3mVAC
D - 0.25mVAC
E - 6.7mVAC - I assume this is hum and it was a little dangerous to reach around to the hum pot to try to eliminate it so I did not - should be able to do better than this
F - Held the Lazy Ribbon to my ear and could hear not a thing.


The noise numbers are quite good so I don't think there will be any major wiring changes required for the second DSET, although I will reposition the amplifier so that I am able to try out the hum pot for the DHT Channel.  Next up I will make it safe and get a mate to help me lift it upstairs and into position.  Once there I will see if I can figure out the audio analyser and make some more checks and measurements.  I really want to make a detailed input impedance graph and I have the software here to do it...I think you would be interested in that plot Romy.


Woohoo!
01-04-2019 Post does not mapped to Knowledge Tree
Romy the Cat


Boston, MA
Posts 10,049
Joined on 05-28-2004

Post #: 146
Post ID: 25226
Reply to: 25225
Very good.
 anthony wrote:
I woke up this morning ….
It was funny that you named it “In my dreams”. Whan I was “designing” and building the Milq I had a lot of dreams about the problem I had. I am not am amplifier designer or some kind of DIY evangelist. In fact I had no truly DIY audio experience before it. I did my phonostage and the power amps because I did not had around me somebody who would do it for me at the level I want to do it. So, when I start to do the damn soldering I was learned a lot and for some period of time it become a very much become full time labor, not time wise but mind-wise. There was a period when Milq took so much time in my life that stopped do anything, literally anything but making Milq to sound right. In the epicenter of that period there was six months when I stopped working, stopped dating, stopped socializing with other people. I woke up 7 AM and went to beg at midnight, all time working on the amplifier and having 100% of time dedicated to thinking about the amplifier. My mind was so saturated at the time by the applier need that I have dream about Milq circuitry, Milq’s problem, Milq’s need… It was a lot of Kafka like dreams…. very certifiable. I am not sorry about that time and I even then had very defined feeling that after I do it I am not planning to do it anymore. So, nowadays if I need to dive into Milq to make some changes then I feel that I am rereading the dairies of my life… very interesting…
 
 anthony wrote:
Then I swapped the used YO186 I purchased just for this testing stage and put in a NOS 1939 vintage tube and the circuit worked straight away with all voltage and current targets just perfect.  Put in a 45 and it was just as perfect.

Congratulations… the old DHT are very finicky…

 anthony wrote:

The DC Offset would not trim to zero and 0.1mV was as low as it would go before running out of trimpot.  The pot from one end to the other would only adjust the DC Offset by 0.7mV, which is much less than I thought it would.  My 0A2 are quite closely matched for voltage and are within 0.3V of each other.  Swapping the tubes had no effect on the DC Offset so I might have to play with another tube to cancel that offset to zero.

 
Yes, I also was not able to make 0mv at DHT. This is fine. The best that I was able to do is 0.4 at one and 0.6 at another amp. That all are very fine numbers. Anything below ~10mV are perfectly fine. If you stick you head to the MH hosts and to correlate the auditable buzz with DC offset on DHT then you will not hear anything under 10—15mV. So, whatever you have: if you do not hear from the speaker then you are fine. Mind you that as the amp juts start you might have a minor HF noise and some glassy sound from speaker – this is from aging 5E6P that will go away as the tube worm up.  The DC offset at the amp input is more friendly and you should be able to make it 0mV


"I wish I could score everything for horns." - Richard Wagner. "Our writing equipment takes part in the forming of our thoughts." - Friedrich Nietzsche
01-04-2019 Post does not mapped to Knowledge Tree
anthony
Posts 335
Joined on 08-18-2014

Post #: 147
Post ID: 25227
Reply to: 25226
Distressingly familiar
 Romy the Cat wrote:
 anthony wrote:
I woke up this morning ….
It was funny that you named it “In my dreams”. Whan I was “designing” and building the Milq I had a lot of dreams about the problem I had. I am not am amplifier designer or some kind of DIY evangelist. In fact I had no truly DIY audio experience before it. I did my phonostage and the power amps because I did not had around me somebody who would do it for me at the level I want to do it. So, when I start to do the damn soldering I was learned a lot and for some period of time it become a very much become full time labor, not time wise but mind-wise. There was a period when Milq took so much time in my life that stopped do anything, literally anything but making Milq to sound right. In the epicenter of that period there was six months when I stopped working, stopped dating, stopped socializing with other people. I woke up 7 AM and went to beg at midnight, all time working on the amplifier and having 100% of time dedicated to thinking about the amplifier. My mind was so saturated at the time by the applier need that I have dream about Milq circuitry, Milq’s problem, Milq’s need… It was a lot of Kafka like dreams…. very certifiable. I am not sorry about that time and I even then had very defined feeling that after I do it I am not planning to do it anymore. So, nowadays if I need to dive into Milq to make some changes then I feel that I am rereading the dairies of my life… very interesting…


To mirror your obsession, but not as the instigator of the project, rather as the duplicator, it has been my plan for some time to take off all of January to get my Melquiades/Macondo installed in my room.  Being self-employed with too many clients to keep satisfied that is not really going to happen but I do plan to be able to operate with the emphasis towards leisure rather than work for the next couple of months as a compromise, perhaps something like week-on week-off, but something at least very flexiblle.  My wife is with me completely in the desire to have this project finished, but I suspect for slightly different reasons than I. 


A sign of my obsession is that I have been too transfixed to respond to some of your earlier posts and comment....


 Romy the Cat wrote:
 
Your chasses design look spectacular by the way. In many year what your will dive back to that amps you will not believe you did it. 


Thanks Romy.  In the back of my mind I always thought that was the kind of self-reaffirming effect that I would like to have...to be able to look back and go "wow, I did THAT".  Even to have my son or daughter keep the system when I am gone and for them to have the same "wow, dad did THAT, and I remember him doing it when I was just a kid"


 Romy the Cat wrote:
 
Generally speaking I would be interested to know how you like to change the crossovers. I feel that sine you have the same configuration as I do I know that result you should be getting and there is a HUGE amount of time invested into this thing to do experimentation, listening, testing, measuring etc and there is not a lot known to me room for improvements. Trust me it has  nothing to do with ego  and I will LOVE to learn if you fine any better way to organize what has been organized, unless you use other compression driver…


Other than the obvious exact crossover points needing to be tweaked for my room, I remember reading somewhere on your site some time ago about perhaps a second order on the Upperbass might be more appropriate for rock music and perhaps a 4th order low pass on the ribbon may improve the results.  Of course I am leaving myself open to these things, and I still listen to most kinds of music.  It was Willie Nelson and some European jazz yesterday but in the press to get stuff finished for Christmas I think I listened exclusively to Bruckner symphonies for almost 6 days straight (I discovered Celibidache and was transfixed by the slow phrasing in particular of the 8th).

Your effort and experimentation and work to fine-tune your system are exactly what attracted me to this project in the first place, and please believe me when I say that the closer I come to a realisation of my efforts the more I understand and appreciate just how colossal yours has been.        
   
01-04-2019 Post does not mapped to Knowledge Tree
anthony
Posts 335
Joined on 08-18-2014

Post #: 148
Post ID: 25228
Reply to: 25227
DSET Power draw
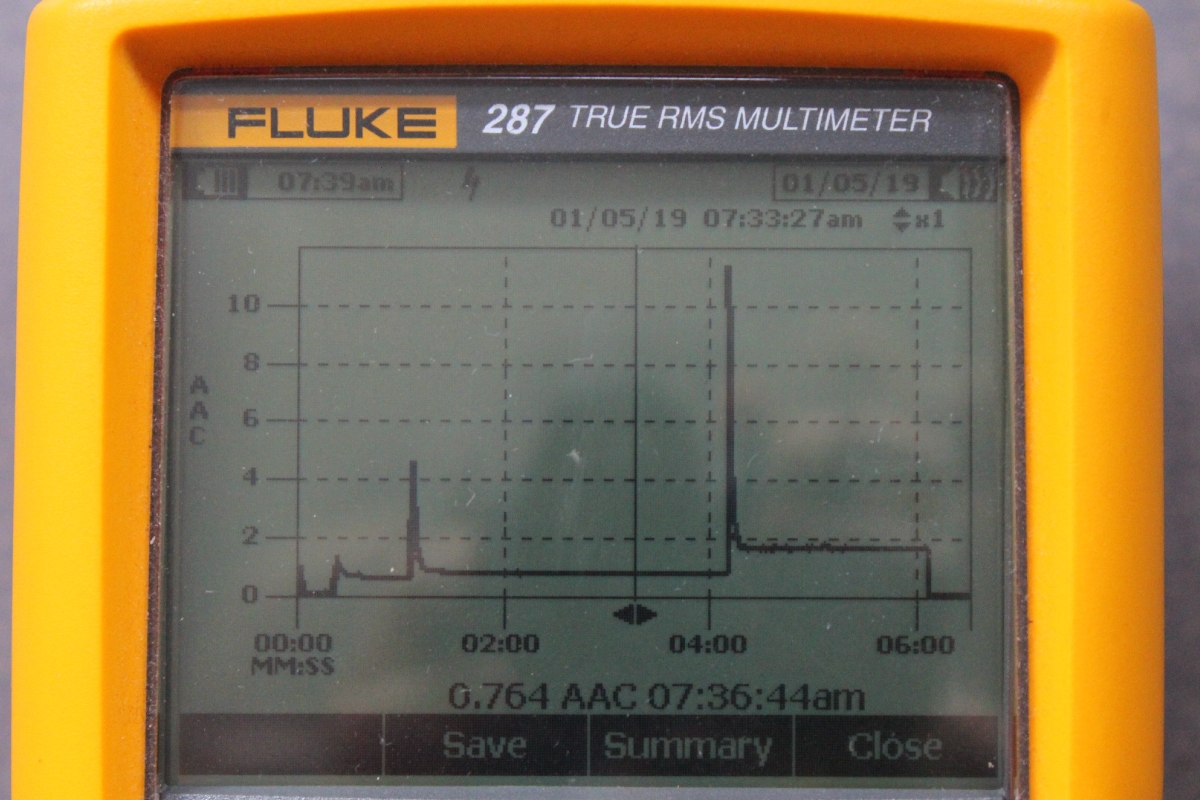
This morning I logged the mains power draw so that I can properly size the fuses.


DSET Power Draw.jpg


Mains power here is 240VAC.


It's a 4 minute startup protocol.  It briefly draws an amp when plugged into the wall and the Services LPS fills its capacitors, then settles down to virtually nothing, less than 20w.  Then I hit the power foot pedal and the AC filaments/heaters are all lit up and being direct AC there are no caps or other electronics so not much of a spike.  The bias and 1st Stages are powered 45 seconds later (just past 1m on the graph) and there is a 5A spike as the power supply caps are filled.  That sits at about 150w until three minutes later the DHT, 2nd Stages and Single Stages power supplies are energized.  The DMM logs once a second and managed to capture about 11A, which is as much as the mains supply is rated, maybe a little more...perhaps I should put in a soft start.  Anyway, after that the amp sits on a pretty neat 400W power draw at idle.  Being Class A that should be where it stays even when playing music.


So, 400 watts power draw to light up a combined total of 30w-33w of output power.


01-04-2019 Post does not mapped to Knowledge Tree
Romy the Cat


Boston, MA
Posts 10,049
Joined on 05-28-2004

Post #: 149
Post ID: 25229
Reply to: 25228
It would be fun to visit you but I never in AU....
 anthony wrote:
To mirror your obsession, but not as the instigator of the project, rather as the duplicator, it has been my plan for some time to take off all of January to get my Melquiades/Macondo installed in my room.  Being self-employed with too many clients to keep satisfied that is not really going to happen but I do plan to be able to operate with the emphasis towards leisure rather than work for the next couple of months as a compromise, perhaps something like week-on week-off, but something at least very flexiblle.  My wife is with me completely in the desire to have this project finished, but I suspect for slightly different reasons than I. 
I was also self-employed, running consulting s-corporation and taking 6 month off I once calculated how much money I lost turning down some lucrative contracts. It was a lot! Well, it was juts money… Saying that I need to admit that if I were married that time I do not think I would be able to pull it off. My compliments to you wife patience
 anthony wrote:
I listened exclusively to Bruckner symphonies for almost 6 days straight (I discovered Celibidache and was transfixed by the slow phrasing in particular of the 8th).    
Now we are taking!!! Celibidache certainly would do it. A few years back I caught live performance of the 8th in London with Vienna and late Mazel. They did a very nice slow version of adagio, not as slow as Celibidache did during his slower concerts but still quite slow but Mazel did some absolutely mind boggling poses and some amassing prolonging phrases that went against all rules of physics. That all make the performance absolutely beyond believe. If you like very slow interpretation, like I do, then you might start to listen some Barbirolli Mahler…
 anthony wrote:
..the closer I come to a realisation of my efforts the more I understand and appreciate just how colossal yours has been. 
Yep, tell it to my wife… :-)
 Anthony wrote:
It's a 4 minute startup protocol.  It briefly draws an amp when plugged into the wall and the Services LPS fills its capacitors, then settles down to virtually nothing, less than 20w.  Then I hit the power foot pedal and the AC filaments/heaters are all lit up and being direct AC there are no caps or other electronics so not much of a spike.  The bias and 1st Stages are powered 45 seconds later (just past 1m on the graph) and there is a 5A spike as the power supply caps are filled.  That sits at about 150w until three minutes later the DHT, 2nd Stages and Single Stages power supplies are energized.  The DMM logs once a second and managed to capture about 11A, which is as much as the mains supply is rated, maybe a little more...perhaps I should put in a soft start.  Anyway, after that the amp sits on a pretty neat 400W power draw at idle.  Being Class A that should be where it stays even when playing music. So, 400 watts power draw to light up a combined total of 30w-33w of output power.
It is not the numbers that I got. I had if I member correctly 330W draw after the amp hit the cruse temperature, the I initial inrush of current was I think about 10A and I use 8A slow blow fuse for the whole amp. The 4 minute startup protocol is kind of slow but it for sure protect the amp's parts well. 


"I wish I could score everything for horns." - Richard Wagner. "Our writing equipment takes part in the forming of our thoughts." - Friedrich Nietzsche
01-05-2019 Post does not mapped to Knowledge Tree
anthony
Posts 335
Joined on 08-18-2014

Post #: 150
Post ID: 25230
Reply to: 25229
You would be most welcome...
...to call in if you ever did get to Aus.  There is plenty to see and experience here, and the weather is great just about all the time.  A critical ear applied to my efforts would be most welcome.

 Romy the Cat wrote:

I was also self-employed, running consulting s-corporation and taking 6 month off I once calculated how much money I lost turning down some lucrative contracts. It was a lot! Well, it was juts money… Saying that I need to admit that if I were married that time I do not think I would be able to pull it off. My compliments to you wife patience


Life is so much more than earning a living.  My slow month or two to start this year will be followed by a hectic ten, so I am not too concerned about lost income.  Doing something because you are passionate about it is so much more rewarding that grinding out the $$$ just because you want more.


 Romy the Cat wrote:

Now we are taking!!! Celibidache certainly would do it. A few years back I caught live performance of the 8th in London with Vienna and late Mazel. They did a very nice slow version of adagio, not as slow as Celibidache did during his slower concerts but still quite slow but Mazel did some absolutely mind boggling poses and some amassing prolonging phrases that went against all rules of physics. That all make the performance absolutely beyond believe. If you like very slow interpretation, like I do, then you might start to listen some Barbirolli Mahler…  


I was working away in my office with youtube in the background pumping out a version of Bruckner 8 that I cannot even remember (Barenboim/Berlin I think), then a Celibadache video of the same symphony came on and I thought it was the rapture.  Oh my!  I got straight on Discogs and bought the DVD set and I don't even have a DVD player, but I will get one (I should have got an Oppo 205 before they sold out).  I will certainly look up the Barbirolli Mahler...   


 Romy the Cat wrote:

It is not the numbers that I got. I had if I member correctly 330W draw after the amp hit the cruse temperature, the I initial inrush of current was I think about 10A and I use 8A slow blow fuse for the whole amp. The 4 minute startup protocol is kind of slow but it for sure protect the amp's parts well. 


Our builds are a little different.  Yours uses all toroids, or mostly so, which are more efficient than the EI that I use.  Your Services power supply (SMPS?) may be more efficient than my 5A linear power supply plus I have a whole extra power supply for the DHT channel that would incur extra losses because of the extra iron.

At the moment I have a fuse for the Service LPS, one for the filaments/heaters and one for the remainder.  3A works fine for all the power supplies (just tested it) but I was now thinking about removing the fuse for the filaments altogether.


Page 6 of 8 (187 items) Select Pages:  « First ... « 4 5 6 7 8 »
Home Page  |  Last 24Hours  | Search  |  SiteMap  | Questions or Problems | Copyright Note
The content of all messages within the Forums Copyright © by authors of the posts